Search This Blog

October 2, 2014

DIY Halloween Costumes - Ventriloquist Doll

Now that it's October, I am 100% in the Halloween spirit!

Last month I showed you how to make a Fall Wreath, but tonight I'm going to share my Halloween costumes (yes, multiple) from last year. If I can find some good pictures from previous years, I may share those at a later date as well... I love me some costumes

Costume 1: Ventriloquist Doll 
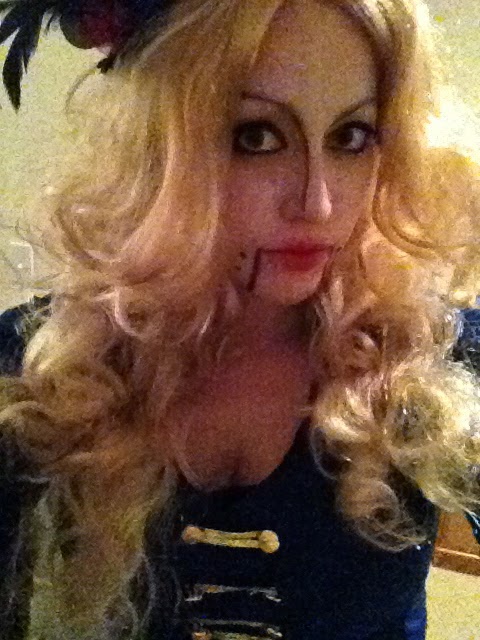
Last year I was completely obsessed with Pinterest (okay who am I kidding, I still am... you can follow me here) and that is where I found the Ventriloquist doll idea... I wanted something potentially slightly creepy. Here's the final product (in Instagram fashion and normal camera view):

Being blonde starting to grow on me

I won't lie... makeup took awhile.

Things I needed/used:
- Blond wig (I brushed it through quite a bit to flatten it some)
- Halloween makeup (a lot of white face paint, some black, and some red)
- Fake eyelashes 
- Paintbrush
- Small toy-looking jacket (purchased from Goodwill)
- Thigh-high black stockings with black bows on the top (purchased from Party City)
- Small black top hat clip (purchased from Party City)
- Black tank top (I already owned)
- Black skirt (I already owned)
- Black heels (I already owned)

I started off by putting my hair up so it would fit in the wig, and then I started on my makeup... as seen below.  I layered the white face paint on all over my face, neck, and chest. I then did the fake eyelashes and used the red paint to give myself small doll lips.


I could have stopped here and been just a normal doll, but I decided to go ahead and try out the rest of the ventriloquist makeup.

After adding the black definition lines, thick eyeliner, and my wig, I was ready.


Blondes really do have more fun

I know that's a lot of selfies (too many... I know I know) BUT I can't find the other pictures from our Halloween party where there are actual photos of me with people, instead of just a bunch of selfies.

Costume 2: She-Devil 
Per my normal mindset, I like to reuse part and pieces of my wardrobe for Halloween - I don't like browsing for those "sexy adult costumes" and spend $100+ on a costume. I was also a she-devil last year.

By reusing most of my ventriloquist doll costume (black stockings, skirt, shoes, and tank top), a red blazer I already owned, and a borrowed headband with sequined devil horns... this was one of the easiest costumes I've ever had to throw together.

Aww check out my little French artist friend :)
I can't wait to make my 2014 costume! I already have my ideas... it will require a trip or two to Hobby Lobby to collect my supplies. Be on the look-out! Or check my Pinterest boards to see if you can guess which of my pinned costume ideas I'll be going for this year. 

Enjoy the Halloween season! 
I can't wait to get some pumpkin carving and baked pumpkin seeds in the works this year.

My flirty 2013 pumpkin

September 6, 2014

DIY: Fall Wreath Tutorial

It has been far too long since I've posted a tutorial, or even just posted anything! Anywho... I'll try not to slack off for so long this time!

It's that time of year again, where pumpkin everything is coming back into our lives. Stores are starting to put out Halloween and Christmas (what???) items. It's just about time for the leaves to change colors and the weather to cool off.

To celebrate, I've made myself a Fall wreath to liven up my apartment door.

Here's the finished product
Unfortunately, I did not take photos while I was building this beauty, so here are the materials needed, and then I will walk you through the steps taken (there's not too many, don't worry).

Materials Needed:
- Wire Wreath Frame (I used a 10" frame)
- Twine (I used a heavy duty jute twine)
- Burlap Ribbon (I used a natural color, burlap mesh ribbon with wire in it)
- Fake Leaves
- Fake Flowers
- Hot Glue/Glue Gun
- Over the Door Wreath Hook

I found all of my materials at Hobby Lobby, but I've also found them at Michael's and JoAnn's.

Once you have all of your materials, you're ready to start!

Using your hot glue, twine, and the wire wreath frame, start glueing and wrapping the twine around the frame. I used a little glue, would wrap about 10 times, and then use another dob of glue.
This part was the most time consuming simply because of the thickness of twine (there are thicker twines out there, in hindsight I should have used larger twine). 

Once the frame is completely wrapped, you'll start to work with the leaves and flowers. Using scissors and some creative bending, twisting, and pulling of the fake leaves off of their stems, I placed a small dob of glue on each leaf stem, and slid the stem in between the twine (this will ensure that the leaves are glued underneath a layer of twine so the stems do not show)

After the leaves were in a formation that I liked (all of mine are heavily on the right-hand side of the frame), I placed small dobs of glue behind the leaves themselves so they would lay flat (some of them were sticking out strange, and I didn't like that - so I made sure they all laid mostly flat).

Next are the flowers, these were pretty easy to just pop off the top of their stems. I then did the same thing with the glue, and placed a small amount on the tiny part of stem that was left, and stuck it into the twine, partially covering the bottom of the leaves.

I only used a handful of flowers until I was satisfied with how it looked. As you can see in the photo above, my flowers are mainly at the bottom of the frame.

To balance out the brightly colored leaves and flowers, I used a small amount of the burlap ribbon to make a bow on the left-hand side of the frame. With the wired ribbon, this made it easier to tie and shape into the perfect bow - I was also able to twist it so it was tilted in a way I liked.

That's it! This was a fairly simple project to complete, and it motivates me to make seasonal wreaths to decorate my door with :)

Enjoy and please ask me questions if you have any!

Happy crafting!